Interaction
This post explores ways to code user interaction in plain javascript, without p5. If you want to use interaction with p5, there are many good resources available to you, but perhaps a good place to start, might be here.
Consider the following html:
<div id=test_div></div>

<script type = module>
    const div = document.getElementById ('test_div')
    console.dir (div)
</script>
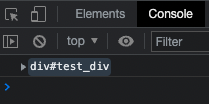
The code makes a <div></div> element, uses its ID to assign it to a javascript variable, and prints it to the console using console.dir (). Using console.dir here instead of console.log () ensures that what gets displayed in the console is " ... an interactive list of the properties of the specified JavaScript object" (from the MDN entry). It should look like this:

Unfolding the object displays a list of its properties - there are lots of them. They are listed in alphabetical order. If you scroll down to the properties that start with on-, you should see something like this:

These are the div element's onevent properties. Assigning a function to one of these properties registers that function to handle those sorts of events. If an event of that sort occurs, the the browser passes an event object to the function registered to handle those events. You can learn more about registering event handlers here.
There are dozens of types of events, including ClipboardEvent, GamePadEvent, and DeviceOrientationEvent. In this post, we will focus on types of UIEvent, including PointerEvent, MouseEvent, TouchEvent, and KeyboardEvent.
Consider the following code:
<div id=test_div></div>

<script type = module>
    const div = document.getElementById ('test_div')
    div.width = div.parentNode.scrollWidth
    div.style.height = `${ div.width * 9 / 16 }px`
    div.style.backgroundColor = `tomato`

    // when a click event is registered by the browser
    // it looks to see if there is a function assigned
    // to the .onclick property of the element that was
    // clicked on.  The browser then passes
    // an event object to that function.  Here we are
    // defining a function that displays that object
    // on the console:
    div.onclick = e => {
        console.log (`onclick:`)
        console.dir (e)
    }

    // as above, but with double-clicks
    div.ondblclick = e => {
        console.log (`ondblclick:`)
        console.dir (e)
    }
</script>
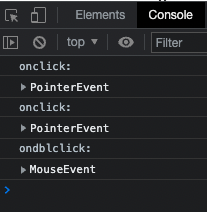
Open the console in your browser and double click on the tomato-coloured <div> below:
Your console should display something like this:

We can see that a single click causes the browser to pass in a PointerEvent, while double clicking causes the browser to pass in a MouseEvent.
From the MDN entry for MouseEvent:
The MouseEvent interface represents events that occur due to the user interacting with a pointing device (such as a mouse). Common events using this interface include click, dblclick, mouseup, mousedown.
From the MDN entry for PointerEvents:
A pointer is a hardware agnostic representation of input devices (such as a mouse, pen or contact point on a touch-enable surface). The pointer can target a specific coordinate (or set of coordinates) on the contact surface such as a screen.
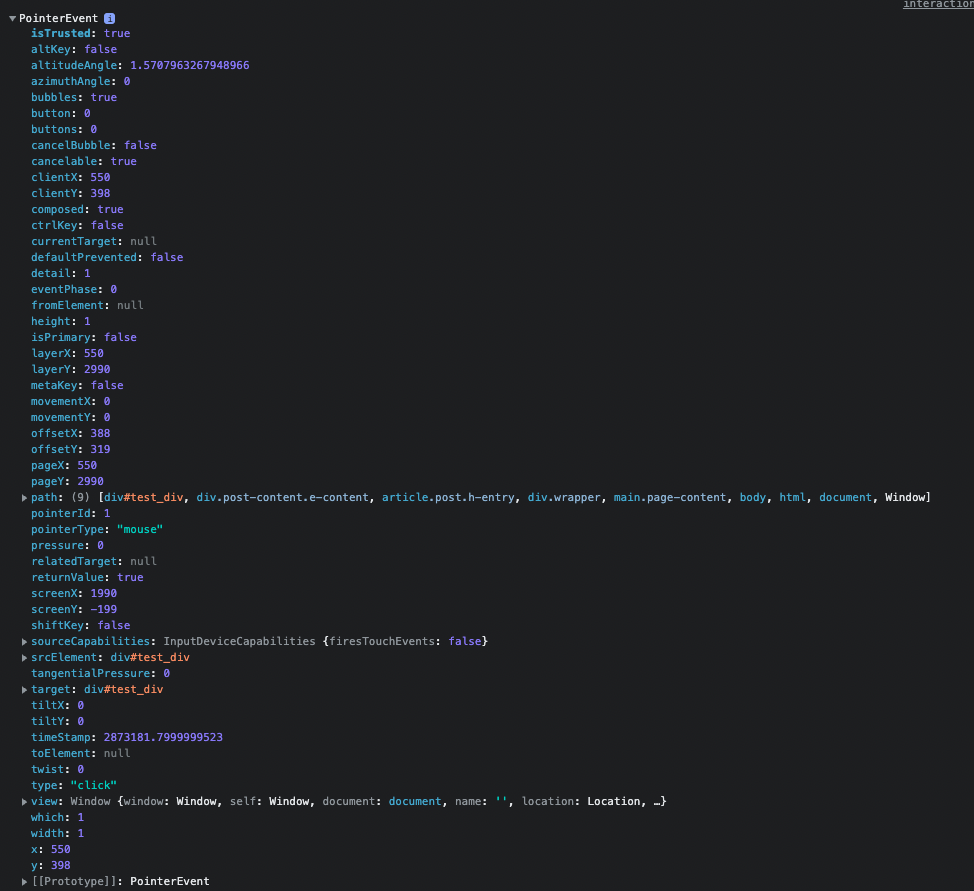
For the moment, lets focus on the PointerEvent:

The pointerEvent object contains a bunch of properties that might be useful to us, particularly the properties that contain information about coordinates.
The different coordinate pairs work slightly differently. In broad strokes:
.clientX&.clientYare relative to the top left corner of the window.pageX&.pageYare relative to the top left corner of the document.offsetX&.offsetYare relative to the top left corner of the DOM element
For a comprehensive explanation of how the different coordinates work in javascript, you can go here. For the time being, the properties we will focus on are .offsetX & .offsetY.
.onclick
Consider the following example. Click to interact:
<canvas id=onclick_example></canvas>

<script type=module>

    // getting and formatting the canvas element
    const cnv = document.getElementById (`onclick_example`)
    cnv.width = cnv.parentNode.scrollWidth
    cnv.height = cnv.width * 9 / 16

    // this array will store the coordinates
    // of the click events
    const coordinates = []

    // this function will take the
    // pointerEvent as an argument
    // and assign it to parameter 'e'
    function add_coordinate (e) {

        // adding to the coordinates array
        // an object with x & y properties
        // storing the values associated
        // with the .offsetX and .offsetY
        // properties of the pointerEvent
        // object assigned to parameter 'e'
        coordinates.push ({
            x : e.offsetX,
            y : e.offsetY
        })
    }

    // adding the function to the
    // .onclick property of the canvas
    // add_coordinate
    cnv.onclick = add_coordinate

    // getting a 2d context
    const ctx = cnv.getContext ('2d')

    // function to draw animation frames
    function draw_frame () {

        // turquoise background
        ctx.fillStyle = `turquoise`
        ctx.fillRect (0, 0, cnv.width, cnv.height)

        // hotpink squares
        ctx.fillStyle = `hotpink`

        // go through the coordinates array
        coordinates.forEach (p => {

            // use the values on the x & y properties
            // of each object to draw a square
            ctx.fillRect (p.x - 10, p.y - 10, 20, 20)
        })

        // call itself recursively
        requestAnimationFrame (draw_frame)
    }

    // call the first frame
    requestAnimationFrame (draw_frame)
</script>
.onpointermove
For this example we will use a class definition:
class Shrinker {

    // position specifies the middle of the object
    // object also needs a size
    // and a canvas context to draw to
    constructor (position, size, context) {
        this.pos = position
        this.siz = size
        this.ctx = context

        // we will use these properties to control
        // the shrinking and growing animation
        this.active = false
        this.phase  = 0
    }

    draw () {

        // if active, increment phase
        if (this.active) {
            this.phase += 0.01
        }

        // if phase is complete
        // disable object and reset phase
        if (this.phase > 1) {
            this.active = false
            this.phase  = 0
        }

        // this mathematics creates the envelope
        // that will shrink / grow the square
        // double goes from 0 - 2
        const double = this.phase * 2

        // rev goes from 2 - 0
        const rev = 2 - double

        // env = whichever one is less
        // env goes from 0 -> 1 -> 0
        const env = Math.min (double, rev)

        // mult goes from 1 -> 0 -> 1
        const mult = 1 - env

        // calculate the size under the envelope
        const len = this.siz * mult

        // calculate the position under the envelope
        const x = this.pos.x - (len / 2)
        const y = this.pos.y - (len / 2)

        // draw the pink square
        // using the values calculated
        this.ctx.fillStyle = `hotpink`
        this.ctx.fillRect (x, y, len, len)
    }
}
Move the mouse over the canvas element to interact:
<canvas id=onpointermove_example></canvas>

<script type=module>
    const cnv = document.getElementById (`onpointermove_example`)
    cnv.width = cnv.parentNode.scrollWidth
    cnv.height = cnv.width * 9 / 16

    // assigning to the onpointermove property
    // a handler defined below
    cnv.onpointermove = pointer_move_handler

    const ctx = cnv.getContext ('2d')

    // calculating the dimension
    // for the Shrinker objects
    // the aspect ratio is 16:9
    // so this will act as both
    // the width and height
    const w = cnv.width / 16

    // array for the Shrinker objects
    const shrinkers = []

    // iterate down the canvas using the width value
    for (let y = w / 2; y < cnv.height; y += w) {

        // iterate across the canvas using the same value
        for (let x = w / 2; x < cnv.width; x += w) {

            // make an object with x & y properties
            // assign to those properties the x & y
            // values as per the for loops, using
            // object literal syntax
            const vec = {
                // property name on the left of the :
                // value (ie. variable) on the right
                x: x,

                // property name on the left of the :
                // value (ie. variable) on the right
                y: y,
            }

            // add to the array, a Shrinker object
            // with those coordinates,
            // and with size w, and also passing in
            // the canvas context
            shrinkers.push (new Shrinker (vec, w, ctx))
        }
    }

    // function assigns the pointerEvent
    // to parameter 'e'
    function pointer_move_handler (e) {

        // expresses the coordinates as a
        // phase between 0-1
        const x_phase = e.offsetX / cnv.width
        const y_phase = e.offsetY / cnv.height

        // find the column and row numbers
        const col = Math.floor (x_phase * 16)
        const row = Math.floor (y_phase * 9)

        // the index of the Shrinker object
        // because they were added to the array
        // row by row
        const i = row * 16 + col

        // if the shrinker at that index is not active
        if (!shrinkers[i].active) {

            // activate it
            shrinkers[i].active = true
        }
    }

    function draw_frame () {

        // turquoise background
        ctx.fillStyle = `turquoise`
        ctx.fillRect (0, 0, cnv.width, cnv.height)

        // go through the shrinkers array
        // call .draw () on each Shrinker object
        shrinkers.forEach (s => s.draw ())

        // call the next animation frame
        requestAnimationFrame (draw_frame)
    }

    // call the first animation frame
    requestAnimationFrame (draw_frame)
</script>
.onkeypress
Type something and press Enter! Make sure the computer's focus is somewhere on this web page.
Code is below.
<div id=onkeypress_input></div>

<script type=module>

    // get and format div
    const div = document.getElementById (`onkeypress_input`)
    div.width = div.parentNode.scrollWidth
    div.style.height = `${ div.width * 9 / 32}px`
    div.style.backgroundColor = `tomato`
    div.style.textAlign  = 'center'
    div.style.lineHeight = div.style.height
    div.style.fontSize   = '36px'
    div.style.fontWeight = 'bold'
    div.style.fontStyle  = 'italic'
    div.style.color      = 'white'

    // array for the elements we will generate
    const free_elements = []

    // call initial frame
    requestAnimationFrame (physics_engine)

    // function to move the elements around
    function physics_engine () {

        // iterate through the free_elements array
        free_elements.forEach (e => {

            // if element is too far to the right
            if (e.offsetLeft > window.innerWidth) {

                // respawn it on the left
                e.style.left = `${ -e.offsetWidth }px`
            }

            // add the elements velocity to its position
            e.style.left = `${ e.offsetLeft + e.x_vel }px`
        })

        // call next frame
        requestAnimationFrame (physics_engine)
    }

    // function to generate elements
    // accepts some text as an argument
    // assigns it to the parameter 't'
    function set_free (t) {

        // create a div element
        const free_div = document.createElement (`div`)

        // assign the text that was passed in
        // to the innerText property of the div
        free_div.innerText = t

        // format the div
        free_div.style.fontSize   = '36px'
        free_div.style.fontWeight = 'bold'
        free_div.style.fontStyle  = 'italic'
        free_div.style.color      = 'hotpink'

        // setting .position to 'fixed' means
        // the position is set against the viewport
        // rather than the document
        free_div.style.position   = 'fixed'

        // incorporate the div in the DOM
        document.body.append (free_div)

        // .offsetHeight is the height of the div element
        // multiplied by how many elements are already in
        // the free_elements array
        const y_offset = free_div.offsetHeight * free_elements.length

        // set the new element underneath the other elements
        free_div.style.top = `${ y_offset }px`

        // .offsetWidth is the width of the div
        // start the div to the left of the screen
        free_div.style.left = `${ -free_div.offsetWidth }px`

        // we can add properties to the DOM objects
        // simply assign to a new property
        // and the value stays there!
        // here we are storing a random x-velocity
        free_div.x_vel = Math.random () * 10

        // add the div to the free_elements array
        free_elements.push (free_div)
    }

    // the keypress listener exists on the document object
    // we assign to it a function that accepts a keyboardEvent
    // and assigns it to the parameter 'e'
    document.onkeypress = e => {

        // the .key property of the keyboardEvent
        // contains what key was pressed
        // if it was Enter
        if (e.key == 'Enter') {

            // call the set_free function
            // with the existing innerText
            set_free (div.innerText)

            // clear the innerText
            div.innerText = ''
        }

        // if it is not enter
        else {

            // add that key to the
            // existing innerText
            div.innerText += e.key
        }
    }
</script>